
Videojet 1000 Series Ink Stream Adjustment: Step-by-Step Guide for CIJ Printhead Alignment
Introduction
Ink stream alignment is one of the most fundamental — and most frequently misunderstood — maintenance procedures on a Videojet 1000 Series continuous inkjet printer. When the ink jet is correctly positioned, the machine runs quietly, codes are sharp, and the gutter recovers ink cleanly between prints. When the alignment is off, the problems compound: satellite drops appear on the substrate, gutter recovery becomes inconsistent, print quality degrades across the character height, and in worst cases, the ink stream misses the gutter entirely — contaminating the printhead cavity and triggering fault codes that bring the line to a stop.
Unlike a blocked nozzle or a filter that needs replacing, an ink stream alignment issue is not always immediately obvious. The machine may still print, and the fault may only become apparent under closer inspection of character quality or after recurring gutter alarms. Knowing how to identify the problem, understand the mechanism behind it, and perform the adjustment correctly is a core competency for any technician responsible for maintaining Videojet 1000 Series machines.
This guide covers the ink stream adjustment procedure for the Videojet 1000 Series in detail — the components involved, how the two adjustment screws work, what correct ink line position looks like, and the operational context that determines when an adjustment is necessary.
What Is Ink Stream Adjustment and Why It Matters
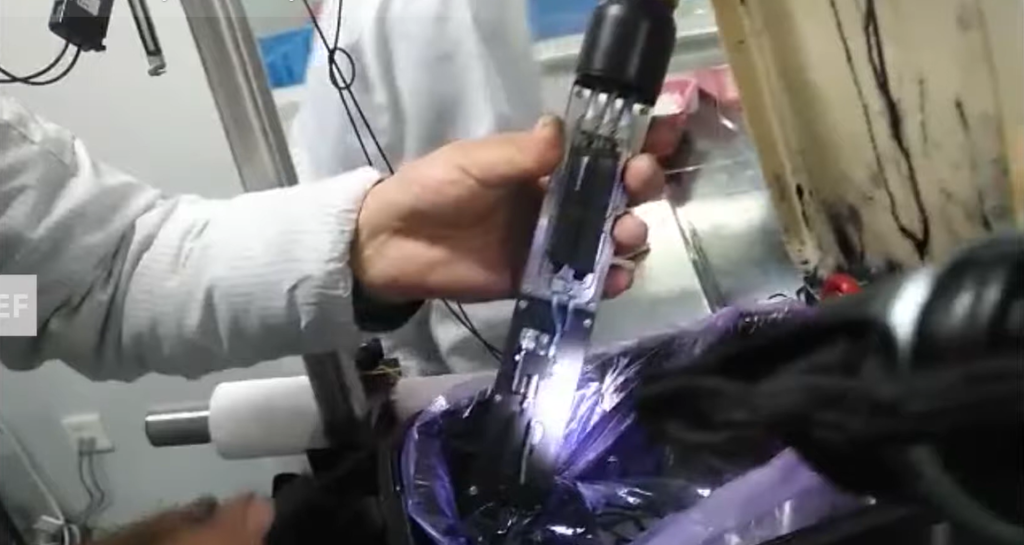
In a continuous inkjet printer, the ink jet is a continuous stream of charged and deflected droplets that must follow a precise trajectory through the printhead. This trajectory is defined by the nozzle orifice angle, the charge electrode position, the deflection plate geometry, and — critically — the physical alignment of the ink stream entering the gutter when not printing.
The gutter is the recovery channel that catches undeflected ink droplets and returns them to the ink system for recirculation. For this recovery to work reliably, the ink stream must enter the gutter at the correct position — centered, stable, and repeatable under varying operating conditions including temperature fluctuations, viscosity changes, and line vibration.
When the ink stream is misaligned — either too far forward or too far backward relative to the gutter — the following problems develop:
- Gutter recovery failures — ink misses the gutter, accumulates in the printhead cavity, and triggers low-pressure or gutter fault codes
- Satellite drop contamination — misaligned jets produce secondary droplets that land unpredictably on the substrate
- Inconsistent print quality — character height and dot placement become variable across a production run
- Printhead contamination — ink buildup inside the printhead housing requires more frequent cleaning and increases the risk of component damage
- Recurring machine alarms — gutter and pressure faults that clear temporarily but return because the root cause (alignment) has not been addressed
On the Videojet 1000 Series, ink stream position is controlled by two dedicated screws on the printhead assembly. Understanding what each screw does — and which one to adjust first — is the foundation of the procedure.
The Two Adjustment Screws: Function and Relationship
The Videojet 1000 Series printhead uses a two-screw system to control the front-to-back position of the ink line relative to the gutter. These are not interchangeable fasteners — each has a specific role, and they must be used in the correct sequence.
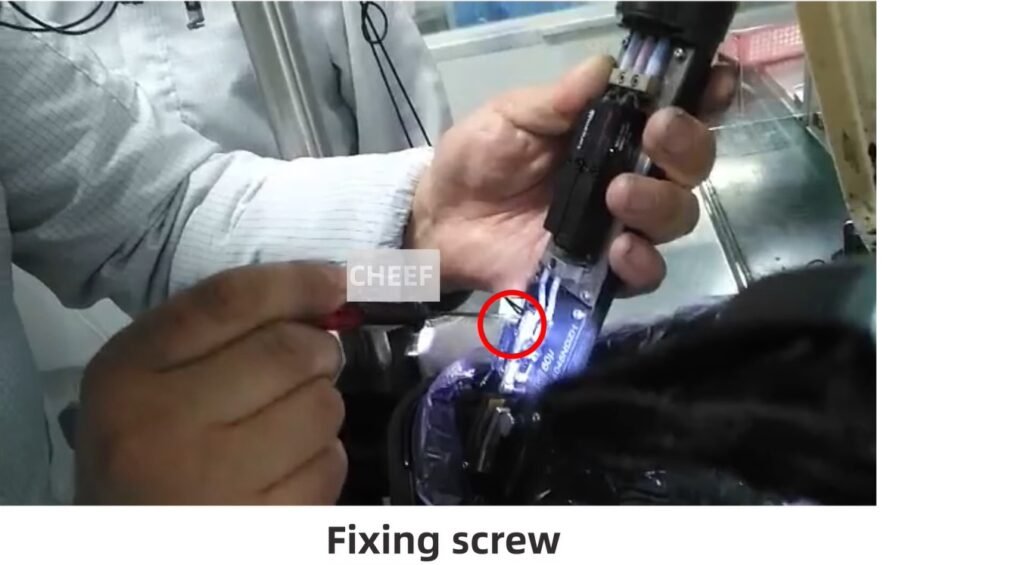
The Fixing Screw
The fixing screw is the locking mechanism. Its function is to hold the printhead nozzle assembly in position once the correct alignment has been achieved. Before any adjustment can be made to the ink stream position, the fixing screw must be loosened. Attempting to turn the regulating screw while the fixing screw remains tight will either strip the adjustment mechanism or produce no movement at all.
The fixing screw does not itself move the ink stream — it only locks or releases the assembly. When the adjustment is complete and the ink stream is verified to be in the correct position, the fixing screw is tightened to secure the setting.
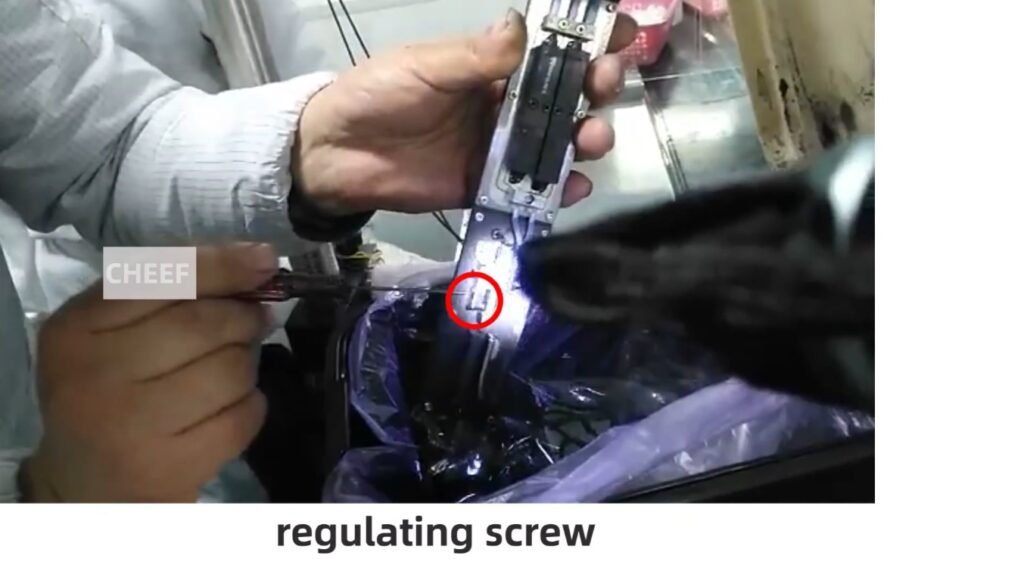
The Regulating Screw
The regulating screw is the active adjustment mechanism. Once the fixing screw has been loosened, turning the regulating screw moves the nozzle assembly forward or backward, changing the angle at which the ink jet enters the gutter channel. This is the screw that directly controls where the ink line lands.
The relationship between the two screws is straightforward in principle: loosen the fixing screw to unlock movement, use the regulating screw to set position, then re-tighten the fixing screw to lock the setting. In practice, the challenge is in the precision required — the adjustment range is small, the effect on ink stream position is sensitive, and over-adjustment in either direction replaces one alignment problem with another.
Correct Ink Stream Position: What to Look For
The target position for ink stream alignment on the Videojet 1000 Series is with the ink line positioned to the right side of the gutter when viewed from the front of the printhead.
This is the key practical reference point from the adjustment procedure. “To the right” means the ink stream is entering the gutter on the right-hand side of the channel opening — not centered, not to the left, but specifically to the right. This positioning accounts for the ink stream’s natural flight path under operating conditions and ensures reliable gutter entry across the range of normal viscosity and pressure variation the machine will experience in production.
When assessing ink stream position:
- The jet should be clearly visible entering the gutter from the correct side
- There should be no ink accumulation visible around the gutter entrance or on the deflection plate surfaces
- The stream should appear clean and stable — a flickering or unstable jet that changes position under observation indicates a different problem (viscosity, pressure, or nozzle condition) rather than a simple alignment issue
- After adjustment, allow the machine to run for a short stabilization period before confirming the position is holding
If the ink line is visibly entering the gutter from the left side or center of the channel, or if it is grazing the gutter entrance rather than entering cleanly, adjustment is required.
Step-by-Step Ink Stream Adjustment Procedure
The following procedure applies to standard Videojet 1000 Series machines. Always follow your facility’s lockout/tagout procedures and wear appropriate PPE — solvent-based inks require eye and skin protection when working in close proximity to the printhead.
Preparation
- Allow the machine to complete its startup sequence and reach stable operating pressure before attempting any adjustment
- Confirm the fault being addressed — if the machine is showing a gutter fault or the ink stream is visibly misaligned, proceed with adjustment; if the issue is print quality only, rule out other causes (viscosity, phase calibration, nozzle condition) before adjusting alignment
- Have appropriate cleaning materials within reach in case of ink spillage during the procedure
- Ensure the printhead cover is accessible and that you have clear line of sight to the gutter area
Adjustment Steps
Step 1 — Observe current ink stream position With the jet running, observe where the ink stream is entering the gutter. Note whether the stream is entering from the left, center, or right of the channel. This establishes the direction of adjustment needed.
Step 2 — Loosen the fixing screw Using the appropriate tool, loosen the fixing screw on the printhead assembly. Do not remove it entirely — loosen it only enough to allow the nozzle assembly to move when the regulating screw is turned. Removing the fixing screw completely risks losing the component inside the printhead housing.
Step 3 — Adjust using the regulating screw Turn the regulating screw incrementally. Small movements produce meaningful changes in ink stream position — this is not a coarse adjustment. Turn the screw, observe the effect on the ink stream position, and continue adjusting until the stream is entering the gutter cleanly from the right side.
Step 4 — Confirm stable position Once the ink stream appears correctly positioned to the right, allow the machine to run for approximately one to two minutes and observe the stream again. Temperature and pressure stabilization can cause slight movement after initial adjustment. If the position shifts, make a minor correction.
Step 5 — Tighten the fixing screw With the ink stream confirmed in the correct position, tighten the fixing screw to lock the nozzle assembly in place. Do not overtighten — sufficient torque to hold the assembly secure without distorting the surrounding components.
Step 6 — Run a print test Print a test message and inspect character quality. Sharp, fully formed characters with consistent dot placement confirm the adjustment has been successful. If print quality remains inconsistent, assess other potential causes before re-adjusting the ink stream.
When Ink Stream Adjustment Is Required
Ink stream position does not drift randomly under normal operating conditions. When alignment is needed, there is usually a specific reason. Understanding the common causes helps maintenance teams address the root condition rather than repeatedly re-adjusting:
After printhead removal or servicing — Any procedure that involves removing the printhead assembly can disturb the nozzle position. Ink stream alignment should be part of the standard post-service verification checklist after any printhead work.
After a hard machine fault or impact — A production line collision, a machine fall, or a severe vibration event can physically shift the nozzle assembly position even without visible damage.
After extended downtime with dried ink deposits — Ink accumulation around the nozzle and gutter entrance can physically deflect the jet. In these cases, cleaning the printhead area first is essential — adjusting the ink stream while deposits are present produces a setting that will be wrong once the deposits are cleaned away.
Gradual drift on aging machines — On high-hour machines, the fixing screw’s holding torque can degrade over time, allowing the nozzle assembly to shift slightly under thermal cycling. If ink stream adjustment is becoming a frequent requirement on an older machine, inspect the fixing screw thread and the nozzle mounting hardware.
After nozzle replacement — A new nozzle will almost always require ink stream alignment as part of the installation procedure. The replacement nozzle position will differ from the worn one by enough to require deliberate alignment.
Troubleshooting: Ink Stream Adjustment Issues
| Symptom | Likely Cause | Recommended Action |
|---|---|---|
| Ink stream not moving when regulating screw is turned | Fixing screw still engaged | Loosen fixing screw before attempting any regulating adjustment |
| Ink stream moves but immediately returns to old position | Fixing screw not fully tightened after adjustment | Re-check fixing screw torque; ensure it is holding the assembly securely |
| Ink stream position correct but gutter faults persist | Secondary issue — pressure, viscosity, or gutter blockage | Check ink pressure, make-up levels, and clean the gutter channel |
| Print quality poor despite correct ink stream position | Phase calibration or nozzle condition | Run phase calibration; inspect nozzle for partial blockage or damage |
| Ink stream unstable or flickering | Viscosity out of range or pump issue | Check make-up fluid level and ink viscosity; inspect pump performance |
| Adjustment required repeatedly over short intervals | Fixing screw thread wear on aging machine | Inspect and replace fixing screw and mounting hardware |
| Ink accumulation in printhead cavity after adjustment | Adjustment set too far — stream missing gutter | Re-adjust; target right-side gutter entry; clean printhead cavity before resuming |
| Fine ink mist visible around printhead area | Jet break-up before gutter entry | Check nozzle condition, operating pressure, and ink temperature |
Maintenance Recommendations for Ink Stream Stability
Correct ink stream alignment is easier to maintain than it is to recover. The following practices reduce the frequency of adjustment requirements and extend stable operating intervals between service interventions:
Run the proper shutdown sequence every time. The 1000 Series shutdown flush clears the ink path and nozzle before stopping the jet. Cutting power without shutting down deposits dried ink in and around the nozzle orifice, which can deflect the jet on next startup.
Keep make-up fluid levels within the operating range. Ink viscosity is the most significant variable affecting jet stability and gutter recovery. Low make-up fluid causes viscosity to rise, which changes the jet’s flight characteristics and can cause the stream to shift position at the gutter even when alignment has not physically changed.
Clean the printhead area on a regular schedule. Ink mist and solvent vapor will gradually deposit on the charge electrode, deflection plates, and gutter entrance. These deposits accumulate slowly but affect jet trajectory progressively. Scheduled printhead cleaning prevents the buildup from reaching a level where it affects alignment.
Log any recurring gutter faults. A gutter fault that clears itself and recurs every few hours is an early indicator of ink stream alignment drift. Addressing this at the first recurrence takes five minutes. Waiting until it causes a production stoppage takes significantly longer.
Verify alignment after any planned maintenance that involves the printhead. Printhead removal, nozzle cleaning, and electrode replacement should all be followed by an ink stream position check as a standard post-service step rather than an optional one.
Use only specified genuine inks and make-up fluids. Non-genuine or incorrect consumables alter the viscosity profile of the ink system. Even a small viscosity difference from specification changes the dynamics of the jet at the gutter, and may make an otherwise correctly aligned ink stream behave inconsistently under production conditions.
Application Context: Where Ink Stream Alignment Has the Highest Impact
Ink stream alignment is critical across all Videojet 1000 Series applications, but certain production environments make the consequences of misalignment more immediate:
High-speed beverage lines — At high line speeds, even minor ink stream instability translates directly to smeared or incomplete codes on fast-moving plastic and glass containers. Gutter recovery faults at high speed can deposit ink onto the line, causing product contamination concerns.
Food and pharmaceutical coding — In regulated environments, code quality is not a preference — it is a compliance requirement. Misaligned ink streams that produce incomplete batch codes or date codes can trigger production holds and rework. Alignment verification should be part of pre-production checks on regulated lines.
Dusty or high-vibration environments — Construction material lines, cable manufacturing, and automotive parts marking often involve elevated vibration and airborne particulates. Both factors accelerate nozzle position drift and printhead contamination, making alignment checks a more frequent operational requirement in these settings.
Multi-shift operations — Machines running continuously across multiple shifts accumulate operating hours quickly. Alignment verification should be incorporated into shift handover checks rather than reserved for scheduled service visits.
Frequently Asked Questions
Q1: How often should the ink stream position be checked on a Videojet 1000 Series machine?
On machines in continuous production, ink stream position should be visually verified during routine maintenance intervals — at minimum monthly, or more frequently on high-duty or high-vibration applications. If the machine has been serviced, had a printhead component replaced, or has experienced any impact or unexpected shutdown, check alignment before returning to production.
Q2: What happens if the ink stream is adjusted too far in one direction?
Over-adjustment causes the ink stream to miss the gutter entrance entirely or to enter it at a steep angle that reduces recovery efficiency. The immediate result is ink accumulation inside the printhead cavity, followed by contamination of the deflection plates and charge electrode. If this occurs, stop the jet immediately, clean the printhead cavity thoroughly, and re-adjust with smaller incremental turns on the regulating screw.
Q3: Can I perform ink stream adjustment without stopping the jet?
Yes — the adjustment is performed with the jet running, because you need to observe the ink stream position in real time as the regulating screw is turned. This is a live procedure. Appropriate eye protection is essential, and the adjustment should be made deliberately with small, controlled turns rather than rapid changes.
Q4: The gutter fault clears when I shake the printhead umbilical — does that indicate an alignment issue?
Not directly. If movement of the umbilical affects the fault, the more likely cause is a wiring intermittent fault in the gutter sensor circuit rather than a mechanical alignment issue. Check the gutter sensor connection and umbilical cable condition before performing an ink stream adjustment.
Q5: After adjustment, the machine runs correctly for a day and then the gutter fault returns. What is causing this?
Recurring alignment drift is usually caused by either a worn or undertightened fixing screw that cannot hold the nozzle assembly position through thermal cycling, or a viscosity issue that changes the jet’s behavior over a shift. Check fixing screw torque first, then verify make-up fluid consumption and ink viscosity readings across the shift.
Q6: Is ink stream adjustment the same procedure on all Videojet 1000 Series models?
The two-screw principle — fixing screw and regulating screw — applies across the Videojet 1000 Series family. However, the physical location and access method for these screws can vary between specific models and printhead configurations. Always refer to the machine-specific service documentation and, if in doubt, consult a qualified technician rather than attempting the procedure based on a different model’s layout.
Conclusion
Ink stream adjustment on the Videojet 1000 Series is a precise but accessible procedure for technicians who understand the mechanism. The fixing screw releases the assembly; the regulating screw sets the position; the ink line to the right of the gutter is the target. That is the core of the procedure.
What makes it more than a simple mechanical task is the diagnostic layer around it — understanding why the alignment drifted, whether cleaning needs to happen before adjusting, and whether a recurring gutter fault is an alignment issue or something else entirely. Technicians who approach the adjustment systematically rather than reactively spend less time at the printhead and more time with the machine running.
For facilities managing multiple Videojet 1000 Series machines across a production floor, incorporating ink stream position checks into routine maintenance schedules — rather than responding to faults after they develop — is the single most cost-effective step for maintaining consistent uptime and print quality.
Need Technical Support for Videojet 1000 Series Maintenance?
Our team provides technical support, spare parts, and maintenance services for Videojet 1000 Series and other CIJ inkjet printers. Whether you need guidance on ink stream adjustment, printhead servicing, or consumables selection, we are available to support your operation. Contact us for a technical assessment.

