
Understanding Videojet Ink Core Technology: Classification and Step-by-Step Replacement Guide
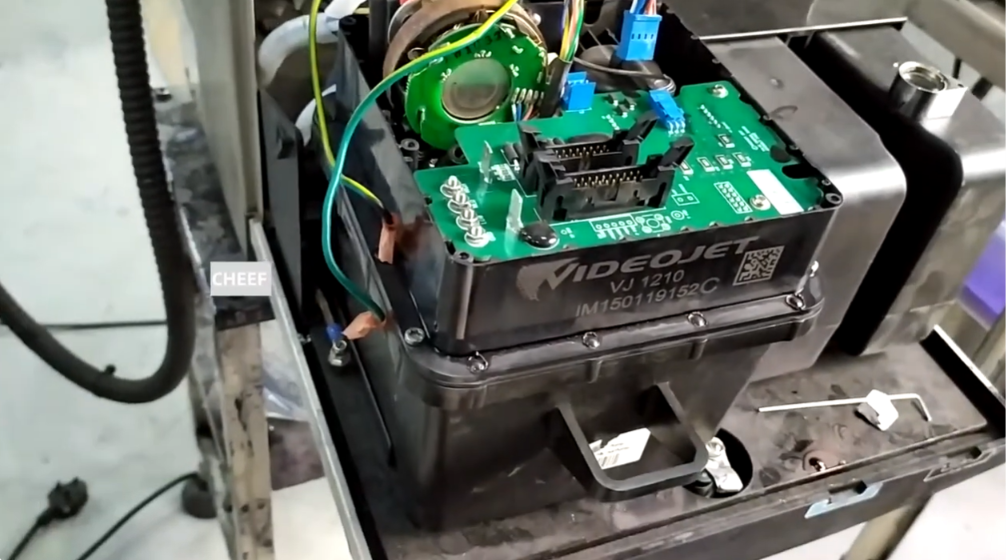
Continuous Inkjet (CIJ) printers are the backbone of high-speed product identification across industries such as food and beverage, pharmaceuticals, and electronics packaging. At the heart of these printers lies the ink core assembly. For technical managers, operators, and industrial distributors maintaining Videojet 1000 Series printers (like the VJ 1210, 1220, 1510, 1520, and 1610), understanding ink core classification and knowing how to execute a proper replacement is essential for preventing unplanned downtime and optimizing fluid consumption.
This technical guide clarifies the architectural differences among Videojet ink cores and provides a professional, step-by-step installation walkthrough based on field-tested procedures.
Executive Summary: The Role of the Ink Core
In modern industrial CIJ printing systems, the ink core module replaces traditional complex networks of discrete pumps, tubes, and individual filters. It consolidates critical fluid management components—including ink and makeup filtration systems, pressure regulators, and fluid distribution valving—into a single, sealed unit.
Proper management of this module prevents common performance issues such as nozzle blockages, unstable ink streams, and poor drop formation. Replacing the core at recommended service intervals ensures that vital internal filtration components do not become saturated, which could otherwise lead to critical fluid contamination and motherboard errors.
Technical Insights: Videojet Ink Core Classifications
Videojet ink cores are structurally categorized into specific letter types (A, B, C, D, E) corresponding to particular machinery configurations, specialized fluid chemical compositions, and specific valve requirements.
Solenoid Valve Internal Configuration
The main functional difference between these modules is the internal valve layout designed to handle specific types of ink (e.g., standard MEK-based inks, high-pigment opaque inks, or specialty food-grade fluids):
- Type A and Type B Cores: Engineered for standard, multi-purpose applications. These ink cores feature an integrated internal manifold containing three sets of solenoid valves to control the standard routing of ink, makeup fluid, and gutter return.
- Type C, Type D, and Type E Cores: Specialized configurations built for heavy industrial or high-pigment applications. These modules contain two sets of solenoid valves on one side, but utilize a different layout designed to isolate chemical pathways and accommodate specialized fluid formulations.
Structural Discrepancies
Because ink core plate configurations and electrical connection distributions differ from one type to another, ink cores are not universally interchangeable. The internal valve structures and specific fluid pathways vary considerably. Industrial distributors must ensure exact cross-referencing of the printer serial number and ink type before initiating a core swap.
Step-by-Step Ink Core Replacement Guide
Before beginning maintenance, ensure you have a clean work surface, appropriate Personal Protective Equipment (PPE) suitable for handling industrial solvents, a standard medium Phillips screwdriver, and an anti-static wrist strap.
Phase 1: Accessing the Internals and Motherboard Removal
First, shut down the printer safely via the interface panel and completely disconnect the main power source. Open the printer casing door to expose the main ink compartment module. Loosen the retention block by removing the two primary structural chassis screws holding the protection cover over the electrical pathways.
Next, carefully unfasten the four small corner screws that secure the printer motherboard/ink core plate interface to the housing structure. Disconnect the auxiliary wiring harnesses and pull the top motherboard screws loose. Finally, unplug the main multi-pin communication plug and gently lift the motherboard assembly up and out of the way to gain unhindered access to the lower ink core block.
Phase 2: Extracting the Saturated Ink Core
Identify the connection lines and valving modules located on the internal manifold. Trace the four independent valve ports on the side of the assembly block. Carefully detach the fluid distribution line block and slide the entire unified ink core module up and out of its mounting rails within the printer chassis.
Phase 3: Installing the New Ink Core Module
Inspect the new core module to verify that the replacement letter type matches the old core identically. Slide the new core into the mounting rails, making sure all underlying fluid connections and O-rings seal properly.
Reposition the interface plate and reconnect the main communication connection plug. Align the electrical module board over the alignment pins and tighten the four primary corner motherboard mounting screws down securely. Reinstall the protective upper shroud assembly and torque the remaining structural chassis plate screws firmly.
Troubleshooting and Preventative Maintenance
| Symptom | Probable Root Cause | Corrective Technical Action |
| Ink stream instability after core swap | Air pocket trapped within the new internal core filters. | Execute the system “Ink Line Prime” routine through the diagnostic tools menu 2–3 times. |
| “Ink Core Communication Error” on boot | Main interface multi-pin plug not fully seated. | Power down the system, re-open the shroud, and verify the main electrical plug is locked. |
| Fluid weeping around the core base | Misaligned fluid block or damaged interface O-ring during installation. | Remove the core, verify that all underlying rubber gaskets are seated correctly, and re-torque. |
Preventive Field Tips
- Prevent Nozzle Blockages: Never leave internal fluid pathways open to the atmosphere during a swap. Have the new ink core prepared and install it immediately after removing the old one to prevent ink from drying inside the internal ports.
- Wash Ink Paths Regularly: Utilize the printer’s automated flushing cycles weekly if operating in harsh, dusty, or temperature-variable manufacturing environments.
Industrial Applications
Food and Beverage Packaging
High-speed bottling and canning lines utilize Type A/B standard modules running fast-drying MEK inks for clean date code and batch tracking applications. These environments require reliable, high-volume uptime where standard fluids provide optimal adhesion and contrast on plastics, glass, and aluminum.
Extrusion, Wire, and Cable Industries
Dark substrates require heavy, high-contrast pigmented inks (such as white, yellow, or light blue). These opaque formulations rely on Type C, D, or E ink cores, which handle heavy solid particulate suspensions without settling or clogging. The specialized two-valve setup in these cores ensures continuous agitation and proper flow control to mitigate pigment sedimentation.
Frequently Asked Questions
Can I use a Type C ink core in place of a Type A core if the dimensions look identical?
No. While the external dimensions may appear similar, the internal structures and valve counts differ significantly. A Type A core uses three sets of valves while a Type C core uses two sets. Swapping them will cause immediate fluid routing failures and software errors on the motherboard.
How often should an industrial distributor recommend changing the Videojet ink core?
Depending on the specific model and ink chemistry (e.g., standard vs. pigmented), Videojet ink cores are typically rated for 8,000 to 14,000 hours of operation. Check your machine’s diagnostic menu to monitor the remaining lifespan countdown.
What should I do if the printer shows a fluid level error immediately after replacing the core?
This usually indicates an air pocket within the new core module. Run a full fluid system priming cycle through the printer’s maintenance menu to displace the air with fresh ink and makeup fluid.
Watch the Full Video Tutorial:
This article summarizes the key points from our original video. Watching the full tutorial provides a clearer understanding of the procedures, demonstrations, and practical maintenance tips.
▶ Watch the full video below.
📺 Subscribe to the Cheef YouTube Channel to receive future maintenance guides, troubleshooting tutorials, product demonstrations, and industry updates.
