
Hydraulic System Recovery: Troubleshooting Gutter Vacuum and Recycling Faults on the Videojet 43s
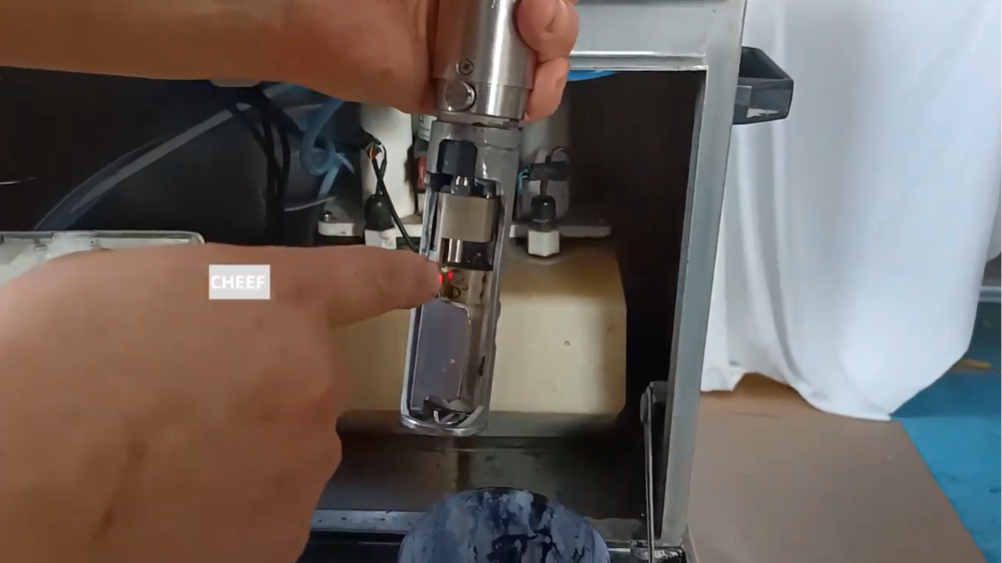
The fluid circulation loop of the Videojet 43s industrial Continuous Inkjet (CIJ) printer relies on reliable pressure balance. When the printhead fires its jet, any ink drops not used for printing characters must travel into the recovery gutter. This recycling pathway uses a continuous vacuum to pull the uncharged fluid back into the main ink core block.
When a “Recovery Failure” or gutter fault occurs, this circulation loop breaks down. Ink quickly pools inside the printhead housing, creating a mess and triggering automated safety faults that halt the packaging line.
For technical floor managers and industrial maintenance engineers, resolving a recovery failure on the Videojet 43s requires a systematic approach to cleaning the fluid paths and calibrating the printhead mechanics.
Technical Insights: Fluid Recycling Failure Modes
The recycling system on the Videojet 43s relies on a precise alignment between the pressurized ink stream leaving the nozzle and the vacuum suction pulling fluid into the gutter. When the printer registers a recovery failure, the root cause generally falls into one of two categories:
- Hydraulic Path Obstruction: The nozzle orifice or the gutter throat is partially blocked by dried ink scale or environmental dust, which distorts or stops the fluid flow.
- Mechanical Structural Shift: The printer’s internal plumbing is clear, but the physical components of the printhead have drifted out of alignment due to line vibrations, causing the ink stream to miss its target.
Phase 1: Cleansing the Hydraulic Orifice Path
Before adjusting any mechanical screws, you must eliminate physical debris as the source of the recovery failure.
Step 1: Isolate the Printhead
Stop the printer jet safely through the operator panel and turn off the high-voltage system. Remove the protective printhead cover and place the entire assembly over a solvent collection tray, tilting it downward so runoff cannot travel backward into the umbilical conduit lines.
Step 2: Trigger the Automated Nozzle Flush
Navigate to the printer display interface. Enter the maintenance or system configuration menu and select the automated Nozzle Flush utility. This routine directs a high-pressure burst of clean makeup solvent straight through the internal fluid lines to dissolve clogs.
Step 3: Manual Solvent Application
If the automated flush does not completely clear the path, take a manual wash squeeze bottle filled with the matching cleaning solvent (MEK or Ethanol base). Spray the solvent directly over the center gap of the nozzle assembly plate and the mouth of the recovery gutter to break apart any hardened pigment scale. Wipe the surrounding deck using only clean, lint-free technical wipes.
Phase 2: Dual-Axis Printhead Mechanical Realignment
If the fluid pathways are clear but the ink stream still fails to enter the recycling tube, continuous machinery vibrations have likely loosened the nozzle assembly plate over time. This shifts the drop generator out of alignment relative to the stationary gutter plate.
To true the ink stream back into specification, you must calibrate the dual-axis structural adjustment screws located directly on the printhead block.
Step 1: Calibrating Longitudinal and Axial Alignment (Up and Down)
Locate the primary lock screw responsible for vertical and longitudinal positioning on the printhead assembly. Use a precision screwdriver to loosen this specific screw gently by a fraction of a turn. Carefully nudge the nozzle base plate upward or downward until the ink stream shifts straight along the longitudinal axis.
Step 2: Calibrating Lateral Alignment (Left and Right)
If the stream remains deflected to the left or right of the recycling tube opening, locate the adjacent lateral positioning adjustment screw. Loosen this secondary screw to release structural tension on the side tracks. Carefully adjust the positioning plate until the pressurized ink line shoots cleanly into the dead center of the recovery recycling tank mouth.
Step 3: Securing the Module Lock
Once you verify visually that the ink stream passes perfectly into the center of the gutter without clipping the edges, hold the positioning plate steady. Hand-torque both structural adjustment screws firmly back down to ensure engine vibrations cannot cause further mechanical shifts during production.
Diagnostic Matrix for Field Remediation
| Active System Symptom | Probable Technical Root Cause | Field Action Plan |
| Ink Pooling on Printhead Floor | Total loss of vacuum suction due to a clogged gutter tube or a loose purge line. | Use a maintenance syringe filled with solvent on the gutter purge line to pull out internal blockages. |
| Stream Shoots Crooked on Startup | Microscopic dried ink scale remaining on the edge of the jewel nozzle plate. | Run the Nozzle Flush sequence while applying fresh wash solvent directly to the nozzle faceplate. |
| Stream Hits Gutter Edge / Clips Plate | Loose printhead adjustment screws allowing the nozzle module to drift out of position. | Loosen the dual-axis retention screws, re-center the stream path using a precision screwdriver, and lock down screws. |
Fleet Maintenance Protocols for High Uptime
- Enforce Clean Drying Procedures: Never use standard paper towels or cotton swabs to clean or dry the internal printhead deck. They drop small wood fibers that get drawn into the gutter line, building up over time until they create a stubborn internal vacuum clog.
- Always Run the Automated Shutdown Flush: Never shut down a Videojet 43s by cutting the main power switch. Always trigger the automated shutdown cycle, which clears out raw ink and fills the nozzle and recovery lines with clean solvent to prevent ink crystallization while the machine sits idle.
Frequently Asked Questions
Why does my Videojet 43s show a recovery failure code even though the ink stream looks perfectly centered?
This usually indicates a problem further down the vacuum line. Even if the stream enters the gutter mouth correctly, a clogged internal filter within the ink core block or an air leak at the fluid manifold connection can reduce the suction power, preventing the vacuum pump from pulling the fluid all the way back to the core.
Can I use a thin metal pin to scrape away dried ink inside the gutter mouth?
No. The components inside the printhead deck are machined to precise tolerances. Using hard metal tools can scratch or distort the gutter throat or the nearby plates, which alters fluid dynamics and can lead to recurring ink buildup and short circuits. Use only approved wash solvents and lint-free wipes.
How often should the printhead alignment be inspected on a high-speed production line?
Under standard operation, the mechanical alignment should remain stable for months. However, if the printer is mounted directly onto a high-vibration frame—such as a continuous canning conveyor or an extrusion line—you should check the stream alignment visually as part of your weekly preventative maintenance checklist.
Watch the Full Video Tutorial:
This article summarizes the key points from our original video. Watching the full tutorial provides a clearer understanding of the procedures, demonstrations, and practical maintenance tips.
▶ Watch the full video below.
📺 Subscribe to the Cheef YouTube Channel to receive future maintenance guides, troubleshooting tutorials, product demonstrations, and industry updates.
