
Precision Maintenance: Industrial Nozzle Clearing Protocols for Videojet 1000 Series Printers
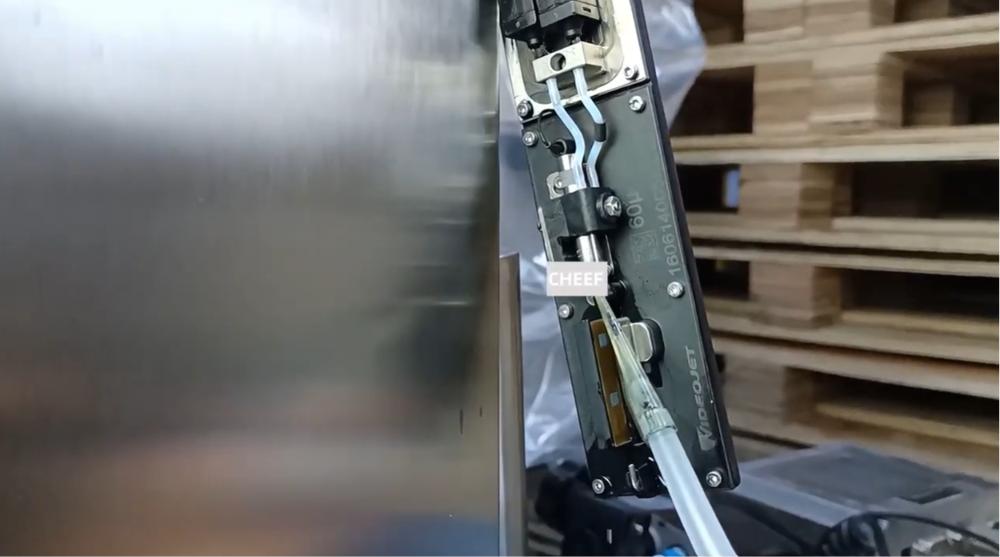
In continuous inkjet (CIJ) printing, the microscopic nozzle orifice is the single most critical point for establishing a stable, well-modulated ink stream. On high-volume production lines utilizing Videojet 1000 Series printers (including the VJ 1210, 1510, and 1610), a nozzle diameter measured in microns means that even a single microscopic fiber or dried ink flake will cause instant stream deflection. This results in misaligned print codes, high-voltage tripping, or immediate gutter faults.
For technical floor managers and machinery distributors, mastering the correct physical cleaning sequence—and understanding how to utilize the system’s internal hydraulics—is the foundation of keeping packaging lines running efficiently.
Technical Insights: The Geometry of a Clogged Nozzle
The printhead assembly operates by pushing pressurized ink through a jewel nozzle plates to form a continuous fluid thread. When a printer is turned off without a proper flush, or when it operates in highly dusty manufacturing plants (like flour milling or plasterboard extrusion), debris can collect in two distinct ways:
- External Faceplate Build-Up: Dried ink accumulation occurs on the outer face of the nozzle plate. This typically causes the ink stream to shoot crooked, missing the recovery gutter entirely.
- Internal Orifice Restriction: Solid particulate matter becomes trapped inside the nozzle hole itself. This completely blocks the fluid path, causing zero pressure at the printhead deck or sending erratic micro-sprays across the high-voltage deflector plates.
Technical Execution: Manual Clean and Backflush Routine
To safely clear a stubborn blockage without damaging the high-precision jewel plate, follow this field-tested procedure.
Phase 1: Preparing the Printhead Deck
- Navigate to the interface console and ensure the jet is completely stopped. Do not perform manual cleaning while the high-voltage system is active.
- Remove the printhead cover and position the printhead module firmly over a designated solvent recovery tray.
- Angle the printhead downward so that dirty runoff solvent flows into the tray and cannot run backward into the electrical wiring umbilical conduit.
Phase 2: Targeted Solvent Application
- Fill a fine-tip wash bottle with the exact cleaning solvent matching your current ink base (e.g., MEK or Ethanol).
- Direct the solvent stream forcefully at the nozzle faceplate to dissolve any external crust.
- Gently wipe the surrounding metal drop-generator surfaces using only clean, lint-free technical wipes. Never use cotton swabs or abrasive rags, which shed fibers that will immediately re-clog the orifice.
Phase 3: Activating the Diagnostic Backflush
- Access the printer’s maintenance or service software menu on the touch screen.
- Select the automated Nozzle Backflush utility. This reverses the hydraulic loop, creating a vacuum draw at the nozzle orifice instead of outward pressure.
- While the vacuum cycle is running, apply fresh cleaning solvent directly over the nozzle hole. The internal vacuum will pull the solvent backward through the jewel plate, drawing the trapped particulate out of the nozzle and routing it safely into the waste line.
- Repeat the backflush toggle three to four times for severe blockages until the vacuum draws fluid smoothly without sputtering.
Troubleshooting Common Clearing Faults
| Post-Cleaning Symptom | Probable Technical Root Cause | Corrective Field Action Plan |
| Stream Still Shoots Crooked | Residual ink scale remains on the trailing edge of the nozzle orifice. | Run the backflush routine again while gently soaking the nozzle plate face with warm wash solvent. |
| High Voltage Short Circuit on Startup | Residual wash solvent trapped behind the deflector plates or on the charge tunnel. | Use dry, low-pressure compressed air to thoroughly blow out the printhead internal deck until all wet shine is gone. |
| Ink Weeping from Nozzle Body | The nozzle assembly plate was physically jarred or loosened during a heavy mechanical clean. | Inspect the nozzle retaining ring threads, ensure the plate sits perfectly square, and hand-tighten gently. |
Essential Field Maintenance Practices
- Ban Hard Tools Absolutely: Under no circumstances should a technician attempt to clear a nozzle hole using a metal wire, sewing needle, or dental pick. The nozzle orifice is machined to microscopic tolerances; a single scratch from a hard tool will permanently ruin the drop modulation physics, requiring a costly replacement of the entire drop generator module.
- Maintain Positive Air Pressure: Ensure the printer’s positive-air filtration kit is active and functioning. This module forces a constant stream of clean, filtered air out of the printhead face, keeping ambient dust from settling onto the wet nozzle plate during operation.
Frequently Asked Questions
Why does my nozzle clog repeatedly within a few hours of running production?
Repeated clogging usually means that contamination has entered the main ink lines behind the printhead. This happens if your ink core filters are breaking down due to age, or if unapproved, unfiltered fluids were added to the system. You will likely need to perform a full system fluid flush and replace the primary ink core module.
Is it safe to use industrial ultrasonic baths to clean a Videojet nozzle?
Yes, if the nozzle plate can be detached as an independent component, submersing it in a shallow container of clean wash solvent inside a low-intensity ultrasonic cleaner for two to three minutes is an effective way to dissolve stubborn ink deposits. However, never submerge the entire printhead electrical assembly.
How long can the nozzle be left exposed to open air during a maintenance shutdown?
In warm or dry manufacturing environments, MEK-based inks can dry solid within minutes. If the printer is going to be stopped for longer than fifteen minutes without running an automated shutdown flush, you should manually spray the nozzle faceplate with a liberal coat of solvent to keep the fluid pathways from crusting over.
Watch the Full Video Tutorial:
This article summarizes the key points from our original video. Watching the full tutorial provides a clearer understanding of the procedures, demonstrations, and practical maintenance tips.
▶ Watch the full video below.
📺 Subscribe to the Cheef YouTube Channel to receive future maintenance guides, troubleshooting tutorials, product demonstrations, and industry updates.
